FishPlayer

一个喜欢摸鱼的废物

0%

前言

之前在做CloneConsole的时候,会在每次绘制的时候尝试绘制所有的log,然后再交给UnityEditor自己去处理显示的逻辑。因为我们会堆积几百甚至几千条log,这样的做法无疑会带来性能问题,结果就是console卡得不能用。

思路

其实思路也很简单,只需要画那些会显示出来的item就行了。
在这之前需要算出哪些item是可以被显示出来的

  1. 算出所有的item加起来有多高
  2. 用当前滑条的位置来推算出当前需要绘制的第一条item的索引
  3. 绘制item
  4. 绘制滑条并计算其下一次的位置

其实这个思路应该也能应用到UGUI上,下次我也要试试。

上代码

在一个新窗口中尝试画一画就好。
首先要准备好用来测试的一些数据。

1
2
3
4
5
6
7
8
9
10
11
12
13
14
15
16
17
18
19
20
21

namespace TempDraw
{
[System.Serializable]
public struct TempDrawData
{
public int IconTag;
public string TempMessage;
}

public class TempDrawWindowTester : MonoBehaviour
{
private TempDrawWindowTester _instance = null;
public TempDrawWindowTester Instance => _instance;

List<TempDrawData> m_data = null;

// used to give out the data
public static event System.Action<List<TempDrawData>> OnDataSpread;
}
}

把测试用的数据都存在这个Mono里,再用它的静态事件把数据传递到窗口中。
代码里的 Button attribute 是用来在editor上创建按钮的。

测试用的数据准备好了,我们来来进行绘制。

1
2
3
4
5
6
7
8
9
10
11
12
13
14
15
16
17
18
19
20
21
22
23
24
25
26
27
28
29
30
31
32
33
34
35
36
37
38
39
40
41
42
43
44
45
46
47
48
49
50
51
52
53
54
55
56
57
58
59
60
61
62
63
64
65
66
67
68
69
70
71
72
73
74
75
76
77
78
79
80
81
82
83
84
85
86
87
88
89
90
91
92
93
94
95
96
97
98
99
100
101
102
103
104
105
106
107
108
109
110
111
112
113
114
115
116
117
118
119
120
121
122
123
124
125
126
127
128
129
130
131
132
133

using System.Collections.Generic;
using UnityEditor;
using UnityEngine;

namespace TempDraw
{
public class TempDrawWindow : EditorWindow
{
public static string WINDOW_NAME = "Temp Draw Window";
private static TempDrawWindow _instance = null;
public static TempDrawWindow Instance => _instance;

private List<TempDrawData> m_data = null;
private float m_scrollPosition = 0.0f;

#region temp element
private const float ELEMENT_HEIGHT = 20.0f;
private const float ELEMENT_ICON_SIZE = 20.0f;

#endregion

#region icons
private Texture2D m_infoIconSmall = null;
private Texture2D m_warningIconSmall = null;
#endregion

[MenuItem("Window/Temp Draw Window")]
private static void OpenWindow()
{
TempDrawWindow window = GetWindow<TempDrawWindow>();
Texture2D icon = EditorGUIUtility.Load("icons/UnityEditor.ConsoleWindow.png") as Texture2D;
window.titleContent = new GUIContent(WINDOW_NAME, icon);
}

public void SetData(List<TempDrawData> data)
{
if (null == m_data)
m_data = new List<TempDrawData>();
else
m_data.Clear();

m_data.AddRange(data);
}

private void DrawTempElement(Rect elementRect, int dataIndex)
{
Rect iconRect = new Rect(elementRect.x, elementRect.y, ELEMENT_ICON_SIZE, elementRect.height);
if (m_data[dataIndex].IconTag == 0)
GUI.Label(iconRect, m_infoIconSmall);
else
GUI.Label(iconRect, m_warningIconSmall);

Rect labelRect = new Rect(elementRect.x + ELEMENT_ICON_SIZE, elementRect.y, elementRect.width - ELEMENT_ICON_SIZE, elementRect.height);
GUI.Label(labelRect, $"Tag: {m_data[dataIndex].IconTag} ; Message: {m_data[dataIndex].TempMessage} ;");
}

private void DrawTempRect()
{
// only use half space of this shit window
Rect viewportRect = new Rect(0.0f, 0.0f, this.position.width, this.position.height * 0.5f);

float scrollbarWidth = GUI.skin.verticalScrollbar.fixedWidth;
Rect scrollbarRect = new Rect(viewportRect.x + viewportRect.width - scrollbarWidth, viewportRect.y, scrollbarWidth, viewportRect.height);
Rect currentRect = new Rect(0.0f, 0.0f, viewportRect.width - scrollbarWidth, viewportRect.height);
float viewportHeight = viewportRect.height;
int elementCount = m_data.Count;

GUI.BeginClip(currentRect); // to clip the overflow stuff
int indexOffset = Mathf.FloorToInt(m_scrollPosition / ELEMENT_HEIGHT);
int showCount = Mathf.CeilToInt(currentRect.height / ELEMENT_HEIGHT);
showCount = showCount > elementCount ? elementCount : showCount;
float startPosY = (indexOffset * ELEMENT_HEIGHT) - m_scrollPosition;

for (int i = 0; i < showCount; i++)
{
Rect elementRect = new Rect(0, 0 + startPosY + i * ELEMENT_HEIGHT, currentRect.width, ELEMENT_HEIGHT);
DrawTempElement(elementRect, indexOffset + i);
}
GUI.EndClip();

// do stuff for scroller
float fullElementHeight = elementCount * ELEMENT_HEIGHT;
m_scrollPosition = Mathf.Max(0, GUI.VerticalScrollbar(scrollbarRect, m_scrollPosition, currentRect.height, 0, Mathf.Max(fullElementHeight, currentRect.height)));

int controlId = GUIUtility.GetControlID(FocusType.Passive);
float scrollSensitivity = ELEMENT_HEIGHT;
float maxScrollPos = (fullElementHeight > currentRect.height) ? (fullElementHeight - currentRect.height) : 0;

if (EventType.ScrollWheel == Event.current.GetTypeForControl(controlId))
{
m_scrollPosition = Mathf.Clamp(m_scrollPosition + Event.current.delta.y * scrollSensitivity, 0, maxScrollPos);
Event.current.Use();
}

}

private void GetAsset()
{
m_infoIconSmall = EditorGUIUtility.Load("icons/console.infoicon.sml.png") as Texture2D;
m_warningIconSmall = EditorGUIUtility.Load("icons/console.warnicon.sml.png") as Texture2D;
}

#region life cycle

private void Awake()
{
_instance = this;
m_data = new List<TempDrawData>();
}

private void OnEnable()
{
TempDrawWindowTester.OnDataSpread -= SetData;
TempDrawWindowTester.OnDataSpread += SetData;
GetAsset();
}

private void OnGUI()
{
DrawTempRect();
}

private void OnDestroy()
{
TempDrawWindowTester.OnDataSpread -= SetData;
_instance = null;
}

#endregion

}
}

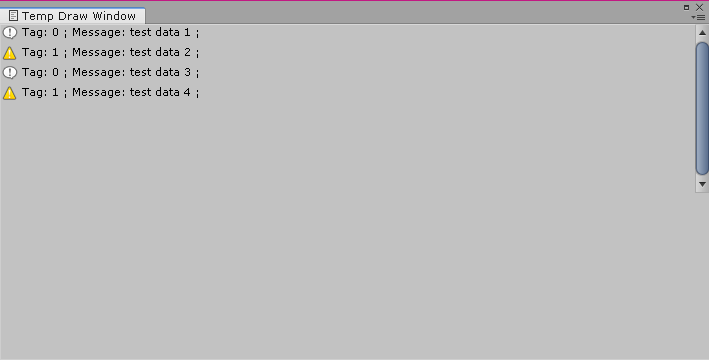
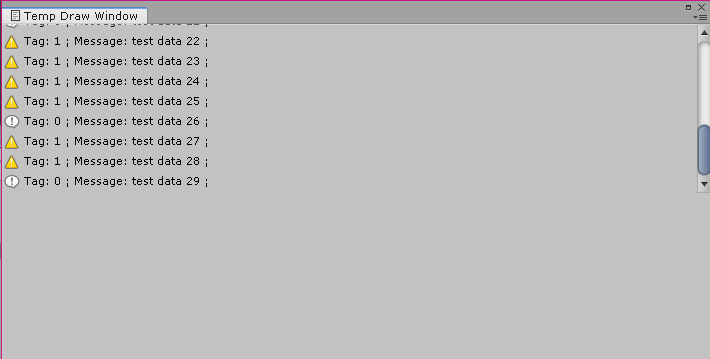
效果如图

Awake: This function is always called before any Start functions and also just after a prefabis instantiated. (If a GameObject is inactive during start up Awake is not called until it is made active.)

OnEnable: (only called if the Object is active): This function is called just after the object is enabled. This happens when a MonoBehaviour instance is created, such as when a level is loaded or a GameObject with the script component is instantiated.

check the exec order here

今天做工时候遇到了一个问题,我在Mono A的 Awake 中把Mono A的实例绑定到了GameManager里,然后再Mono B的 OnEnable 中获取Mono A的实例,结果跳了个空引用异常。
把我惊了,原来这一年多来我一直在一个误区里。

我以前一直认为是当场景里所有的 Awake 跑完才开始跑 OnEnable()。但其实不是这样的。

当一个Mono的 Awake 跑完以后会接着跑他的 OnEnable , 接着才去跑其他物体的 Awake 和 OnEnable。

随便写两行测试一下就知道了。

1
2
3
4
5
6
7
8
9
10
11
12
13
14
15
16
17
18
19
20
21
22
23
24
25
26
27
28
29
30
31
32
33
34
35
36
37
38
39
40
41
42
43
44
45
46
47
48
49

public class TesterA1 : MonoBehaviour
{
private Type m_type = null;

private void Awake()
{
m_type = this.GetType();
Debug.Log($"{m_type.Name} awake");
}

private void OnEnable()
{
Debug.Log($"{m_type.Name} on enable");
}
}

public class TesterB1 : MonoBehaviour
{
// Start is called before the first frame update
private Type m_type = null;

private void Awake()
{
m_type = this.GetType();
Debug.Log($"{m_type.Name} awake");
}

private void OnEnable()
{
Debug.Log($"{m_type.Name} on enable");
}
}

public class TesterC1 : MonoBehaviour
{
private Type m_type = null;

private void Awake()
{
m_type = this.GetType();
Debug.Log($"{m_type.Name} awake");
}

private void OnEnable()
{
Debug.Log($"{m_type.Name} on enable");
}
}

都整上一样的内容,A和C绑在物体tester01上,B绑在物体tester02上。

Classes deriving from Unity. Object inherit equality operators that change the behaviour of the == and != operators.
While these operators will perform standard . NET reference equality, if comparing one side to null, these operators will call native code to check if the underlying native engine object is still alive.

这段解释来自Rider的提示:
https://github.com/JetBrains/resharper-unity/wiki/Avoid-null-comparisons-against-UnityEngine.Object-subclasses

UnityEngine 底层是C++写的,所以说,其实我们对UnityObject的空引用检查都会再深入到里面C++那一层去再检查,这个检查是比较消耗的。
之前曾经遇到因为使用了 ?. 语法糖而导致的 this 指针为null的奇妙bug,大概也是因为这个原因。

现在的公司是做手游的,大家对性能都比较看重,不过我也真的好奇这个检查到底有多消耗,决定跑一跑试试。

Test Case

因为是做手游,随意干脆就在手机上测试好了。
大概是这样的环境:
Unity 2019.4 LTS

移动设备这边是
Google Pixel Verzion(俺穷买美版)
Android 9 (已获取Root权限)

TestCase 这边其实我都是瞎弄的。

分别进行三种测试:
Unity Object 的空引用检查;
POCO Object 的空引用检查;
bool 的直接检查;(因为我觉得这是一个代替Unity Object空引用检查的一个方法

每一种检查都有检查到true和false的两种情况,并循环跑多次。

然后,上代码!

1
2
3
4
5
6
7
8
9
10
11
12
13
14
15
16
17
18
19
20
21
22
23
24
25
26
27
28
29
30
31
32
33
34
35
36
37
38
39
40
41
42
43
44
45
46
47
48
49
50
51
52
53
54
55
56
57
58
59
60
61
62
63
64
65
66
67
68
69
70
71
72
73
74
75
76
77
78
79
80
81
82
83
84
85
86
87
88
89
90
91
92
93
94
95
96
97
98
99
100
101
102
103
104
105
106
107
108
109
110
111
112
113
114
115
116
117
118
119
120
121
122
123
124
125
126
127
128
129
130
131
132
133
134
135
136
137
138
139
140
141
142
143
144
145
146
147

namespace TempCheckTest
{

public class TempObjA
{
private int m_tempNum = 56;
}

public class NullCheckTester : MonoBehaviour
{
// unity obj null check
private Transform m_emptyTransform = null;
private Transform m_selfTransform = null;

// poco obj null check
private TempObjA m_emptyObjA = null;
private TempObjA m_objA = null;

// bool check
private bool m_boolTrue = true;
private bool m_boolFalse = true;

[Header("test")]
public int m_checkTimes = 100000;

[Header("UI side")]
public UnityEngine.UI.Text m_outPutText = null;
public UnityEngine.UI.Button m_doUnityObjTestButton = null;
public UnityEngine.UI.Button m_doPocoObjTestButton = null;
public UnityEngine.UI.Button m_doBoolTestButton = null;

public UnityEngine.UI.InputField m_inputField = null;

[Button("init awake")]
public void InitTester()
{
m_emptyTransform = null;
m_selfTransform = this.transform;

m_emptyObjA = null;
m_objA = new TempObjA();

m_boolTrue = true;
m_boolFalse = false;

m_outPutText.text = string.Empty;

m_doUnityObjTestButton.onClick.RemoveAllListeners();
m_doPocoObjTestButton.onClick.RemoveAllListeners();
m_doBoolTestButton.onClick.RemoveAllListeners();

m_doUnityObjTestButton.onClick.AddListener(DoUnityObjNullCheckTest);
m_doPocoObjTestButton.onClick.AddListener(DoPOCOObjNullCheckTest);
m_doBoolTestButton.onClick.AddListener(DoBoolObjNullCheckTest);

m_inputField.onValueChanged.RemoveAllListeners();
m_inputField.onValueChanged.AddListener(OnInputNumberChanged);
m_checkTimes = 100000;
m_inputField.text = m_checkTimes.ToString();
}

[Button("do unity.object null check test")]
public void DoUnityObjNullCheckTest()
{
System.Diagnostics.Stopwatch watcher = new System.Diagnostics.Stopwatch();
watcher.Start();
for (int i = 0; i < m_checkTimes; i++)
{
if (null == m_emptyTransform) {}

if (null == m_selfTransform) {}
}
watcher.Stop();

string outPut = $"do unity.object null check test 2*{m_checkTimes} cost {watcher.ElapsedMilliseconds}ms";
m_outPutText.text = outPut;
Debug.Log(outPut);
}

[Button("do poco object null check test")]
public void DoPOCOObjNullCheckTest()
{
System.Diagnostics.Stopwatch watcher = new System.Diagnostics.Stopwatch();
watcher.Start();
for (int i = 0; i < m_checkTimes; i++)
{
if (null == m_emptyObjA) {}

if (null == m_objA) {}
}
watcher.Stop();

string outPut = $"do poco object null check test 2*{m_checkTimes} cost {watcher.ElapsedMilliseconds}ms";
m_outPutText.text = outPut;
Debug.Log(outPut);
}

[Button("do bool check test")]
public void DoBoolObjNullCheckTest()
{
System.Diagnostics.Stopwatch watcher = new System.Diagnostics.Stopwatch();
watcher.Start();
for (int i = 0; i < m_checkTimes; i++)
{
if (m_boolFalse) {}

if (m_boolTrue) {}
}
watcher.Stop();

string outPut = $"do bool check test 2*{m_checkTimes} cost {watcher.ElapsedMilliseconds}ms";
m_outPutText.text = outPut;
Debug.Log(outPut);
}

public void OnInputNumberChanged(string arg0)
{
int result = 0;
if (!Int32.TryParse(arg0, out result))
result = Int32.MaxValue;

m_checkTimes = result;
}

#region mono method

private void Reset()
{
InitTester();
}

private void Awake()
{
InitTester();
}

private void OnEnable()
{
this.enabled = false;
}

#endregion

}

}

Test Result

分别进行10w次和100w次测试看看结果。

10w次:
Unity Object null check 4~7ms
POCO Object null check 0ms
bool check 0ms

100w次:
Unity Object null check 45~60ms
POCO Object null check 3~4ms
bool check 2ms

当检测数量非常多的时候,Unity Object 空引用检查的性能消耗比其他两个大了很多很多。现在的项目里大部分东西其实都是POCO的。
似乎把UnityObject Destroy之后再手动把变量置空是个好习惯(

最近在项目组里做一些小游戏原型,深感自己菜得如虫豸。为了慢慢提升还是决定做一些记录,虽然只是很垃圾的功能。
因为做的是手游,所以对性能蛮看重的,说是原型,为了快也只是项目里开了个单独的新场景做的,3C都有,做好了可以直接打包APK试玩。
废话不多说,这次做的事很简单,在扇形区域内检测一些目标。因为听说Vector3. Angle()里会跑开方的计算,故尝试避免使用这个方法。

思路

需要解决的需求是在检测者 前方 的一个扇形内检测目标物体,其实可以化简为2D平面的检测。
我决定多次使用点乘和叉乘来解决这个问题。

已知数据:
检测者的位置,朝向,检测角度大小,半径大小
检测目标的位置

步骤:

  1. 用检测者的前方向量和检测者到目标的方向向量点乘来判断目标物体是否在检测者前方。
  2. 用检测者前方方向向量和检测区域的两个边界方向分别叉乘得到两个法向向量A,B。
  3. 用检测者到目标的方向向量和检测区域的两个边界方向分别叉乘得到两个法向向量C,D。
  4. 用点乘检测C,D是否同向,是,则在检测区外
  5. 是否同时满足向量A,C同向,向量B,D同向,是,则在检测区内

其实我自己都感觉这中文,写得很乱,还不如直接看代码23333
全部代码:

1
2
3
4
5
6
7
8
9
10
11
12
13
14
15
16
17
18
19
20
21
22
23
24
25
26
27
28
29
30
31
32
33
34
35
36
37
38
39
40
41
42
43
44
45
46
47
48
49
50
51
52
53
54
55
56
57
58
59
60
61
62
63
64
65
66
67
68
69
70
71
72
73
74
75
76
77

public class TargetCheckTester : MonoBehaviour
{
private Transform m_transform = null;

[SerializeField]
private float m_checkAngle = 60.0f;

[SerializeField]
private float m_checkRadius = 6.0f;

[SerializeField]
private Transform m_targetTransform = null;

private void CheckTarget1()
{
if (null == m_targetTransform)
return;

Vector3 myPos = m_transform.position;
Vector3 myForward = m_transform.forward;
float halfAngle = m_checkAngle * 0.5f;
Vector3 dirUp = Quaternion.Euler(0.0f, -halfAngle, 0.0f) * myForward;
Vector3 dirDown = Quaternion.Euler(0.0f, halfAngle, 0.0f) * myForward;

Vector3 upCheck = Vector3.Cross(myForward, dirUp);
Vector3 downCheck = Vector3.Cross(myForward, dirDown);

Vector3 targetPos = m_targetTransform.position;
// hack, to make them on a 2d plane :)
targetPos.y = myPos.y;
Vector3 toTargetDir = targetPos - myPos;

// draw line
Vector3 point1 = myPos + dirUp * m_checkRadius;
Vector3 point2 = myPos + dirDown * m_checkRadius;
Vector3 point0 = myPos + myForward * m_checkRadius;

Debug.DrawLine(myPos, point1, Color.yellow, Time.deltaTime);
Debug.DrawLine(myPos, point2, Color.yellow, Time.deltaTime);
Debug.DrawLine(myPos, point0, Color.yellow, Time.deltaTime);
Debug.DrawLine(point1, point0, Color.yellow, Time.deltaTime);
Debug.DrawLine(point2, point0, Color.yellow, Time.deltaTime);
Debug.DrawLine(myPos, targetPos, Color.red, Time.deltaTime);
// draw line

if (Vector3.Dot(toTargetDir, myForward) < 0.0f || toTargetDir.sqrMagnitude > m_checkRadius * m_checkRadius)
return;

Vector3 targetUpCheck = Vector3.Cross(toTargetDir, dirUp);
Vector3 targetDownCheck = Vector3.Cross(toTargetDir, dirDown);

float selfCheck = Vector3.Dot(targetUpCheck, targetDownCheck);
float dotCheckUp = Vector3.Dot(upCheck, targetUpCheck);
float dotCheckDown = Vector3.Dot(targetDownCheck, downCheck);
if (selfCheck <= 0.0f && dotCheckUp * dotCheckDown >= 0.0f)
{
Debug.Log("target in sight");
}

}

#region mono method

private void Awake()
{
m_transform = this.transform;
}

private void Update()
{
CheckTarget1();
}

#endregion

}

一个比较简单但是方便的东西

这是啥

我们平时些写了一些函数在MonoBehavior里想测试,这边可以整一个特性放在需要快速调用的方法上(限于无参数的函数)。
这边可以做一个编辑器的按钮,直接放在MonoBehavior的组件面板上。

上代码

先定义我们需要的这个特性,既然是做个按钮,那就叫Button好了。那么这个特性就应该叫做ButtonAttribute。

1
2
3
4
5
6
7
8
9
[AttributeUsage(AttributeTargets.Method)]
public class ButtonAttribute : Attribute
{
public string m_methodName = string.Empty;
public ButtonAttribute(string methodName)
{
m_methodName = methodName;
}
}

既然我们要在Inspector面板上加东西,那我们也要操作一下Inspector面板。
我们做一个CustomEditor面板给我们的MonoBehavior,这个面板会作用于所有的MonoBehavior。

1
2
3
4
5
6
7
8
9
10
11
12
13
14
15
16
17
18
19
20
21
22
23
24
25
26
27
28
29
30
31
32
33
34
[CustomEditor(typeof(MonoBehaviour), true), CanEditMultipleObjects]
public class BaseEditor : Editor
{
private Type m_targetType = null;

public override void OnInspectorGUI()
{
// draw default stuff
base.OnInspectorGUI();

if (null == m_targetType)
m_targetType = target.GetType();

while (m_targetType != null)
{
// try find member function and static function :)
MethodInfo[] methods = m_targetType.GetMethods(BindingFlags.Instance | BindingFlags.Static | BindingFlags.NonPublic | BindingFlags.Public);
foreach (var method in methods)
{
ButtonAttribute button = method.GetCustomAttribute<ButtonAttribute>();
if (button != null && method.GetParameters().Length > 0)
{
EditorGUILayout.HelpBox("ButtonAttribute: method cant have parameterz.", MessageType.Warning);
}
else if (button != null && GUILayout.Button(button.m_methodName))
{
method.Invoke(target, new object[] { });
}
}
m_targetType = m_targetType.BaseType;
}

}
}

然后新建一个MonoBehavior脚本,试试

1
2
3
4
5
6
7
8
9
10
11
12
13
14
15
16
17
18
19
20
21
22
23
24
25
26
27
28
29
public class ToxicTester : MonoBehaviour
{

[Button("try exec public method")]
public void ExecPublicMethod()
{
Debug.Log("try exec public method wa");
}

[Button("try exec protected method")]
protected void ExecProtectedMethod()
{
Debug.Log("try exec protected method wa");
}


[Button("try exec private method")]
private void ExecPrivateMethod()
{
Debug.Log("try exec private method wa");
}

[Button("try exec public static method")]
public static void ExecPublicStaticMethod()
{
Debug.Log("try exec public static method wa");
}

}

效果如图

上一期我们做完了基本的面板绘制,现在我们可以往里面添加简单的内容了。

定义显示单位

既然我们要显示Log,那就定义一些数据结构用于存储这些Log。因为这些东西在我们的console中只需要显示就行了,我们只需要定义只读的数据就可以,或许还能提高性能。

1
2
3
4
5
6
7
8
9
10
11
12
13
14
15
16
17
18
19
20
21
22
23
24
25
26
27
28
29
30
31
32
33
34
35
36
37
38
39
40
41
42
43
44
45
46
47
48
49
50
51
52
53
54
55
56
57
58
59
60
61
62
63
64
65

public class LogItem
{
public bool IsSelected { get; set; }
public readonly string LogInfo = string.Empty; // Log简要信息
public readonly string LogMessage = string.Empty; // Log 调用栈!
public readonly LogType GetLogType = LogType.Log;

public LogItem(bool isSelected, string info, string message, LogType type)
{
IsSelected = isSelected;
// 记得加上时间!!!
LogInfo = string.Format("[{0}] {1}", System.DateTime.Now.ToLongTimeString(), info);
LogMessage = message;
GetLogType = type;
}
}

public class TempConsoleWindow : EditorWindow
{
private void LogMessageReceived(string condition, string stackTrace, LogType type)
{
LogItem log = new LogItem(false, condition, stackTrace, type);
m_logItems.Add(log);
switch (type)
{
case LogType.Error:
m_errorLogCount++;
break;
case LogType.Assert:
m_errorLogCount++;
break;
case LogType.Warning:
m_warningLogCount++;
break;
case LogType.Log:
m_normalLogCount++;
break;
case LogType.Exception:
m_errorLogCount++;
break;
default:
m_errorLogCount++;
break;
}

// 主动刷新,因为当此窗口没有焦点时似乎无法走 OnGUI() 刷新。
Repaint();
//GUI.changed = true;
}

private void OnEnable()
{
// ....
// 监听此事件,当Debug.Log("")被调用的时候就会响应
Application.logMessageReceived += LogMessageReceived;
}

private void OnDestroy()
{
// ....
Application.logMessageReceived -= LogMessageReceived;
}

}

在上部面板显示Log

像原本Unity Console一样,每一条Log以一个方条item的形式显示在上半部分面板。
我们先把这个item画出来。
m_selectedLogItem 是我们选中的 LogItem。

1
2
3
4
5
6
7
8
9
10
11
12
13
14
15
16
17
18
19
20
21
22
23
24
25
26
27
28
29
30
31
32
33
34
35
36
37
38
39
40
41
42
43
44
45
46
47
48
49
50
51
52
53
54
55
56
57
58
59
60
61
62
63
64
65
66
67
68
69
70
71
72
73
74
75
76
77
78
79
80
81
82
83
84
85
86
87
88
89
90
91
92
93
94
95
96
97
private bool DrawLogBox(in string content, LogType logType, bool isOdd, bool isSelected)
{
if (isSelected)
{
m_boxItemStyle.normal.background = m_boxBgSelected;
}
else
{
if (isOdd)
{
m_boxItemStyle.normal.background = m_boxBgOdd;
}
else
{
m_boxItemStyle.normal.background = m_boxBgEven;
}
}

switch (logType)
{
case LogType.Error:
m_boxIcon = m_errorIcon;
break;
case LogType.Assert:
m_boxIcon = m_errorIcon;
break;
case LogType.Warning:
m_boxIcon = m_warningIcon;
break;
case LogType.Log:
m_boxIcon = m_infoIcon;
break;
case LogType.Exception:
m_boxIcon = m_errorIcon;
break;
default:
break;
}
// 这个按钮是因为这条box item是可以被点击选择的!!!
return GUILayout.Button(new GUIContent(content, m_boxIcon), m_boxItemStyle, GUILayout.ExpandWidth(true), GUILayout.Height(30.0f));
}

private void DrawUpperPanel()
{
m_upperPanel = new Rect(0, MENU_BAR_HEIGHT, this.position.width, (this.position.height - MENU_BAR_HEIGHT) * m_upperSizeRatio);
GUILayout.BeginArea(m_upperPanel, m_panelStyle);
GUILayout.Label("Log", m_panelLabelStyle);

// 在scrollview里填充log,unity
m_upperPanelScroll = GUILayout.BeginScrollView(m_upperPanelScroll);
for (int i = 0; i < m_logItems.Count; i++)
{
if (m_logTypeForUnshow.Contains(m_logItems[i].GetLogType))
{
continue;
}

// 画的时候,顺便接受item的点击的结果
if (DrawLogBox(m_logItems[i].LogInfo, m_logItems[i].GetLogType, i % 2 == 0, m_logItems[i].IsSelected))
{
if (null != m_selectedLogItem)
{
if (m_logItems[i] == m_selectedLogItem)
{
// click a some one, open code
// JumpToCurrentLogPos(); // 跳转到你点击的Log的顶部的代码文件(如果可以
}
else
{
m_selectedLogItem.IsSelected = false;
m_selectedLogItem = m_logItems[i];
m_selectedLogItem.IsSelected = true;
}
}
else
{
m_selectedLogItem = m_logItems[i];
m_selectedLogItem.IsSelected = true;
}
// 准备刷新
GUI.changed = true;
}
}

GUILayout.EndScrollView();
GUILayout.EndArea();
}


private void OnGUI()
{
// .....
if (GUI.changed)
{
Repaint();
}
}

显示Log详情以及调用栈

由于我脑子不好使,我不知道如何完美复刻Unity Console的详情,Unity自带Console中显示的代码链接既可以复制也可以点击跳转,我只做了简单的跳转。如果有比较熟悉编辑器开发的朋友,可以提供修改的方法。

1
2
3
4
5
6
7
8
9
10
11
12
13
14
15
16
17
18
19
20
21
22
23
24
25
26
27
28
29
30
31
32
33
34
35
36
37
38
39
40
41
42
43
44
45
46
47
48
49
50
51
52
53
54
55
56
57
58
59
60
61
62
63
64
65
66
67
68
69
private void DrawLowerPanel()
{
float yPos = PanelGroupHeight * m_upperSizeRatio + MENU_BAR_HEIGHT + RESIZER_HEIGHT;
m_lowerPanel = new Rect(0, yPos, this.position.width, PanelGroupHeight * (1.0f - m_upperSizeRatio));
GUILayout.BeginArea(m_lowerPanel, m_panelStyle);
GUILayout.Label("Log Detail", m_panelLabelStyle);

m_lowerPanelScroll = GUILayout.BeginScrollView(m_lowerPanelScroll);

string logDetail = null;
string[] logDetailMutiLine = null;

// TODO : code clean here
string pathline = "";
string tempCase = ".cs:";
string path = string.Empty;
int line = 0;
int splitwa = 0;

if (null != m_selectedLogItem)
{
logDetail = m_selectedLogItem.LogMessage;
GUILayout.TextArea(string.Format("{0}\n", m_selectedLogItem.LogInfo), m_textAreaStyle);

logDetailMutiLine = logDetail.Split('\n');
for (int i = 0; i < logDetailMutiLine.Length; i++)
{
// Regex match 'at xxx'
Match matches = Regex.Match(logDetailMutiLine[i], @"\(at (.+)\)", RegexOptions.Multiline);

if (matches.Success)
{
while (matches.Success)
{
pathline = matches.Groups[1].Value;
if (pathline.Contains(tempCase))
{
int splitIndex = pathline.LastIndexOf(":");
path = pathline.Substring(0, splitIndex);
line = Convert.ToInt32(pathline.Substring(splitIndex + 1));
string fullpath = Application.dataPath.Substring(0, Application.dataPath.LastIndexOf("Assets"));
fullpath = fullpath + path;
splitwa = logDetailMutiLine[i].LastIndexOf("(");
logDetailMutiLine[i] = logDetailMutiLine[i].Substring(0, splitwa);

GUILayout.BeginHorizontal();
GUILayout.TextArea(string.Format(" (at : {0})\n", logDetailMutiLine[i]), m_textAreaStyle);
if (GUILayout.Button(string.Format(" ( {0} )\n", pathline), m_labelButtonStyle))
{
// 打开文件的魔法
UnityEditorInternal.InternalEditorUtility.OpenFileAtLineExternal(fullpath.Replace('/', '\\'), line);
}
GUILayout.FlexibleSpace();
GUILayout.EndHorizontal();
break;
}
}
}
else
{
GUILayout.TextArea(logDetailMutiLine[i], m_textAreaStyle);
}

}
}

GUILayout.EndScrollView();
GUILayout.EndArea();
}

这边用了正则表达式去匹配去寻找代码文件,是从网上查到的,我用着还不太熟练。所以写得很乱,后续会在工程中更新干净些的版本。

完善菜单栏功能

既然我们能显示Log了,那就别忘了补上清除Log的功能。

1
2
3
4
5
6
7
8
9
10
11
12
13
14
15
16
17
18
19
20
21
22
23
24
25
26
public void ClearLogs()
{
if (null != m_selectedLogItem)
{
m_selectedLogItem.IsSelected = false;
}
m_selectedLogItem = null;

m_normalLogCount = 0;
m_warningLogCount = 0;
m_errorLogCount = 0;
m_logItems.Clear();
GUI.changed = true;
}


private void DrawMenuUpperBar()
{
// .....
if (GUILayout.Button(new GUIContent("Clear"), EditorStyles.toolbarButton, GUILayout.Width(40.0f)))
{
// 用于清空所有的 log
ClearLogs();
}
// .....
}

总结

这一期就到这里。感觉工具开发也有点搬砖,但是会用到各种各样的搬砖工具去搬运契合不同的砖,能接触到很多东西,还蛮有趣的。
下一期我会尝试把当前这个乞丐Log Console的功能都补齐。
代码有缺漏可以先参考工程。


完整工程链接

https://github.com/2C2C2C/TempUnityLogConsoleClone

本菜狗在上周领了一个做LogManager的任务。很高兴也很慌,毕竟从来没做过编辑器开发,于是面向搜索引擎编程开始辣,找了一些教程学着做,顺便分享一下。

需求分析(?

组里对这个LogManager的要求是在Unity原来的Log功能上再加上根据标签和危险度(?)来筛选。
仔细想想还挺麻烦。需要筛选的话,那自然需要一个Console面板,似乎Unity原本的Console不方便扩展,索性跟着网上的教程重新做一个。

弹出窗口

首先我们先把窗口弹出来。代码很简单。

我们可以从Unity头顶的菜单栏中的Window中找到这个面板并打开。打开了是空白的,当然啦,因为还什么都没画上去。

1
2
3
4
5
6
7
8
9
10
11
public class TempConsoleWindow : EditorWindow
{
[MenuItem("Window/Temp Console")]
private static void OpenWindow()
{
TempConsoleWindow window = GetWindow<TempConsoleWindow>();
GUIContent titleContent = new GUIContent("TempConsole", EditorGUIUtility.Load("icons/UnityEditor.ConsoleWindow.png") as Texture2D, "a clone sonsole");
window.titleContent = titleContent;
}

}

分割区块

我们把原本的面板分成4块:1.菜单栏;2. Log区;3. 调整棒(上下移动调整区域大小);4. 详情区。于是乎我们给这个4个区创建响应的变量为了方便绘制。

1
2
3
4
5
6
7
8
9
10
private Rect m_menuUpperBar = default;
private Rect m_upperPanel = default;
private Rect m_lowerPanel = default;
private Rect m_resizer = default;

private readonly float MENU_BAR_HEIGHT = 20.0f;
private float m_upperSizeRatio = 0.5f;
private readonly float RESIZER_HEIGHT = 4.0f;
private float PanelGroupHeight => position.height - MENU_BAR_HEIGHT;
private bool m_isResizing = false;

偷皮

Unity的绘制GUI方法中可以填写风格参数,我们绘制四个区块的时候自然也需要为区块准备皮和文字颜色。

1
2
3
4
5
6
7
8
9
10
11
12
13
14
15
16
17
18
19
20
21
22
23
24
25
26
27
28
29
30
31
32
33
34
35
36
37
38
39
40
41
42
43
44
45
46
47
48
49
50
51
52
53
54
55
56
57
58
59
60
61
62
63
64
65
66
67
68
69
70
71
72
73
74
75
76
77
78
// log区风格以及log区的标题风格
private GUIStyle m_panelLabelStyle = default;
private GUIStyle m_panelStyle = default;
// 调整棒儿的风格
private GUIStyle m_resizerStyle = default;
// box item 其实是在log区显示的每一个log item
private GUIStyle m_boxItemStyle = default;
// 这是 log详情的文字风格
private GUIStyle m_textAreaStyle = default;
// 这是一个无边框的按钮风格,为代码跳转准备
private GUIStyle m_labelButtonStyle = default;

// 各种图标
private Texture2D m_infoIcon = null;
private Texture2D m_infoIconSmall = null;
private Texture2D m_warningIcon = null;
private Texture2D m_warningIconSmall = null;
private Texture2D m_errorIcon = null;
private Texture2D m_errorIconSmall = null;

private Texture2D m_boxBgOdd = null;
private Texture2D m_boxBgEven = null;
private Texture2D m_boxBgSelected = null;
private Texture2D m_boxIcon = null;

// 获取各种皮
private void GetAssets()
{
m_panelLabelStyle = new GUIStyle();
m_panelLabelStyle.fixedHeight = 30.0f;
m_panelLabelStyle.richText = true;
m_panelLabelStyle.normal.textColor = Color.white;
m_panelLabelStyle.fontSize = 20;

m_infoIcon = EditorGUIUtility.Load("icons/console.infoicon.png") as Texture2D;
m_infoIconSmall = EditorGUIUtility.Load("icons/console.infoicon.sml.png") as Texture2D;
m_warningIcon = EditorGUIUtility.Load("icons/console.warnicon.png") as Texture2D;
m_warningIconSmall = EditorGUIUtility.Load("icons/console.warnicon.sml.png") as Texture2D;
m_errorIcon = EditorGUIUtility.Load("icons/console.erroricon.png") as Texture2D;
m_errorIconSmall = EditorGUIUtility.Load("icons/console.erroricon.sml.png") as Texture2D;

m_resizerStyle = new GUIStyle();

m_panelStyle = new GUIStyle();
m_panelStyle.normal.background = EditorGUIUtility.Load("builtin skins/darkskin/images/projectbrowsericonareabg.png") as Texture2D;
// 这行是同事告诉我的,但是不知道为什么不管用,直接用会有空引用报错,要在GUI里用
// m_panelStyle.normal.background = GUI.skin.window.normal.background;

m_boxItemStyle = new GUIStyle();
m_boxItemStyle.normal.textColor = new Color(0.7f, 0.7f, 0.7f);

m_boxBgOdd = EditorGUIUtility.Load("builtin skins/darkskin/images/cn entrybackodd.png") as Texture2D;
m_boxBgEven = EditorGUIUtility.Load("builtin skins/darkskin/images/cnentrybackeven.png") as Texture2D;
m_boxBgSelected = EditorGUIUtility.Load("builtin skins/darkskin/images/menuitemhover.png") as Texture2D;

m_textAreaStyle = new GUIStyle();
m_textAreaStyle.normal.textColor = new Color(0.9f, 0.9f, 0.9f);
m_textAreaStyle.normal.background = EditorGUIUtility.Load("builtin skins/darkskin/images/projectbrowsericonareabg.png") as Texture2D;

m_labelButtonStyle = new GUIStyle();
m_labelButtonStyle.normal.textColor = Color.green;
m_labelButtonStyle.normal.background = m_textAreaStyle.normal.background;
m_labelButtonStyle.alignment = TextAnchor.MiddleLeft;
m_labelButtonStyle.stretchWidth = false;
var b = m_labelButtonStyle.border;
b.left = 0;
b.right = 0;
b.top = 0;
b.bottom = 0;
m_labelButtonStyle.border = b;

}


private void OnEnable()
{
GetAssets();
}

获取图像的参数都是magic number,这里不多提。图标浏览和获取参数可以参考下面两个页面。当然你也可以准备自己的素材。

https://unitylist.com/p/5c3/Unity-editor-icons
https://gist.github.com/rus89/375e107ed8c6db79d0c41b8612e5dbf3

绘制菜单栏

菜单栏上有几个按钮,我们把最常用的如清理,Play开始清除以及右边三个Filter选项。除了’Clear’是Button,其它的都是Toggle。所以得准备一些布尔变量。

1
2
3
4
5
6
7
8
9
10
11
12
private bool m_isClearOnPlay = false;
private bool m_isClearOnBuild = false;
public bool IsClearOnBuild => m_isClearOnBuild;
private bool m_isErrorPause = false;
private bool m_isShowLog = true;
private bool m_isShowWarning = true;
private bool m_isShowError = true;

private int m_normalLogCount = 0;
private int m_warningLogCount = 0;
private int m_errorLogCount = 0;
private HashSet<LogType> m_logTypeForUnshow = null;

准备好了,那么就可以开始绘制菜单栏了。

1
2
3
4
5
6
7
8
9
10
11
12
13
14
15
16
17
18
19
20
21
22
23
24
25
26
27
28
29
30
31
32
33
34
35
36
37
38
39
40
41
42
43
44
45
46
47
48
49
50
51
52
53
54
55
56
57
58
59
60
61
62
63
private void DrawMenuUpperBar()
{
m_menuUpperBar = new Rect(0.0f, 0.0f, this.position.width, MENU_BAR_HEIGHT);

// 开始绘制
GUILayout.BeginArea(m_menuUpperBar, EditorStyles.toolbar);
// 横向绘制!!!
GUILayout.BeginHorizontal();

if (GUILayout.Button(new GUIContent("Clear"), EditorStyles.toolbarButton, GUILayout.Width(40.0f)))
{
// 用于清空所有的 log
ClearLogs();
}
GUILayout.Space(5.0f);

// m_isCollapse = GUILayout.Toggle(m_isCollapse, new GUIContent("Collapse"), EditorStyles.toolbarButton, GUILayout.Width(55.0f));
m_isClearOnPlay = GUILayout.Toggle(m_isClearOnPlay, new GUIContent("Clear On Play"), EditorStyles.toolbarButton, GUILayout.Width(80.0f));
m_isClearOnBuild = GUILayout.Toggle(m_isClearOnBuild, new GUIContent("Clear On Build"), EditorStyles.toolbarButton, GUILayout.Width(85.0f));
m_isErrorPause = GUILayout.Toggle(m_isErrorPause, new GUIContent("Error Pause"), EditorStyles.toolbarButton, GUILayout.Width(70.0f));

// 弹性空白,我不太清楚应该怎么描述,但是它可以把后面的几个Toggle都尽可能往后面推
GUILayout.FlexibleSpace();

m_normalLogCount = Mathf.Clamp(m_normalLogCount, 0, 100);
m_warningLogCount = Mathf.Clamp(m_warningLogCount, 0, 100);
m_errorLogCount = Mathf.Clamp(m_errorLogCount, 0, 100);
m_isShowLog = GUILayout.Toggle(m_isShowLog, new GUIContent(m_numStrs[m_normalLogCount], m_infoIconSmall), EditorStyles.toolbarButton, GUILayout.Width(30.0f));
m_isShowWarning = GUILayout.Toggle(m_isShowWarning, new GUIContent(m_numStrs[m_warningLogCount], m_warningIconSmall), EditorStyles.toolbarButton, GUILayout.Width(30.0f));
m_isShowError = GUILayout.Toggle(m_isShowError, new GUIContent(m_numStrs[m_errorLogCount], m_errorIconSmall), EditorStyles.toolbarButton, GUILayout.Width(30.0f));

m_logTypeForUnshow.Clear();
if (!m_isShowLog)
{
m_logTypeForUnshow.Add(LogType.Log);
}

if (!m_isShowWarning)
{
m_logTypeForUnshow.Add(LogType.Warning);
}

if (!m_isShowError)
{
m_logTypeForUnshow.Add(LogType.Error);
m_logTypeForUnshow.Add(LogType.Assert);
m_logTypeForUnshow.Add(LogType.Exception);
}

// 横向绘制结束
GUILayout.EndHorizontal();
// 区域绘制结束
GUILayout.EndArea();
}

// 实际调用绘制
private void OnGUI()
{
DrawMenuUpperBar();
//DrawUpperPanel();
//DrawLowerPanel();
//DrawResizer();
}

这样就把菜单栏绘制好了。

简单绘制上下区栏

接下来再绘制调整棒之前先简单绘制上下区,待会儿做好调整棒之后就能直接测试效果。要注意给菜单栏以及调整版预留的高度,不然会得到错误的区域大小,添加调整棒后会更会出现奇怪现象。
现在只需要给上下区绘制空白就可以了。

1
2
3
4
5
6
7
8
9
10
11
12
13
14
15
16
17
18
19
20
21
22
23
24
25
26
27
28
29
30
31
32
33
34
35
36
private void DrawUpperPanel()
{
m_upperPanel = new Rect(0, MENU_BAR_HEIGHT, this.position.width, (this.position.height - MENU_BAR_HEIGHT) * m_upperSizeRatio);
GUILayout.BeginArea(m_upperPanel, m_panelStyle);
GUILayout.Label("Log", m_panelLabelStyle);

// 为了画log item而准备的 ScrollView
m_upperPanelScroll = GUILayout.BeginScrollView(m_upperPanelScroll);
GUILayout.EndScrollView();

GUILayout.EndArea();
}


private void DrawLowerPanel()
{
float yPos = PanelGroupHeight * m_upperSizeRatio + MENU_BAR_HEIGHT + RESIZER_HEIGHT;
m_lowerPanel = new Rect(0, yPos, this.position.width, PanelGroupHeight * (1.0f - m_upperSizeRatio));
GUILayout.BeginArea(m_lowerPanel, m_panelStyle);
GUILayout.Label("Log Detail", m_panelLabelStyle);

// 为 log详情准备的 ScrollView
m_lowerPanelScroll = GUILayout.BeginScrollView(m_lowerPanelScroll);
GUILayout.EndScrollView();

GUILayout.EndArea();
}

// 实际调用绘制
private void OnGUI()
{
DrawMenuUpperBar();
DrawUpperPanel();
DrawLowerPanel();
//DrawResizer();
}

绘制调整棒 添加区域调整

1
2
3
4
5
6
7
8
9
10
11
12
13
14
15
16
17
18
19
20
21
22
23
24
25
26
27
28
29
30
31
32
33
34
35
36
37
38
39
40
41
42

private void DrawResizer()
{
float yPos = (this.position.height - MENU_BAR_HEIGHT) * m_upperSizeRatio + MENU_BAR_HEIGHT;
m_resizer = new Rect(0, yPos, this.position.width, RESIZER_HEIGHT);

GUILayout.BeginArea(new Rect(m_resizer.position + (Vector2.up * RESIZER_HEIGHT), new Vector2(this.position.width, 2.0f)), m_resizerStyle);
GUILayout.EndArea();

// 把 m_resizer 区域内的光标换成拉伸指示光标
EditorGUIUtility.AddCursorRect(m_resizer, MouseCursor.ResizeVertical);
}


private void Resize(Event currentEvent)
{
if (m_isResizing)
{
// 通过鼠标位置改变调整棒位置
float pos = currentEvent.mousePosition.y - MENU_BAR_HEIGHT;

m_upperSizeRatio = pos / PanelGroupHeight;
m_upperSizeRatio = Mathf.Clamp(m_upperSizeRatio, 0.5f, 0.8f);
//Debug.Log($"next upper ratio {m_upperSizeRatio}");
Repaint();
}
}

private void ProcessEvents(Event currentEvent)
{
if (EventType.MouseDown == currentEvent.type)
{
// if press mouse left in resizer
m_isResizing = (0 == currentEvent.button && m_resizer.Contains(currentEvent.mousePosition));
}
else if (EventType.MouseUp == currentEvent.type)
{
m_isResizing = false;
}

Resize(currentEvent);
}

总结

其实感觉编辑器开发挺麻烦的,除了区域绘制要注意,还有一堆API不好查不会用。下一期将会将Log信息捕获并显示在我们自己的这个Console上。


完整工程链接(持续更新中) :
https://github.com/2C2C2C/TempUnityLogConsoleClone

P.S : 我在做的时候是参考了某个游戏工作室发布的教程,我也顺便把这个教程分享出来。
https://gram.gs/gramlog/creating-editor-windows-in-unity/

给Unity用上代理

前言

之前有段时间公司的网络不是很稳定,从UnityHub上拖东西99%失败。自己又太菜不想安装Android Studio手动设置安卓打包的东西,于是乎只能想办法给下载加速。

准备

首先你要有那个,就是那个你为了看PH才弄的小工具:)

命令

首先默认我们的小✈代理端口是1080。
似乎V2可以同时有SOCK5和HTTP代理的样子,那也把HTTP代理的端口设置成1080.

1
2
3
4
5
6
7

# 设置代理
set HTTP_PROXY=http://127.0.0.1:1080
set HTTPS_PROXY=http://127.0.0.1:1080

start "" "your unity hub path"
# like path is like -> D:\Unity\Unity Hub\Unity Hub.exe

爆炸

非常简单就是这样。

其实东西都是从有木桑博客看来的
https://www.yomunchan.moe/archives/320

这边有蛮多游戏开发相关的文章,帮了我不少,十分感谢了。

给GIT用上代理

前言

在看着教程搭建这个博客的时候,我在GIT上也拖了不少的包。直连有时候真的速度慢到吐血,原因很复杂也莫得办法。
不过还好,我们其实可以给GIT上个代理,这样能给速度一些改善。

准备

我是在本机器安装有代理客户端,小🛩和V2都彳亍。
我这边的情况是这样的,小飞机走SOCK5代理,V2走的HTTP代理。
因为平时我只可能开着一个,所以端口都是1080。

命令

废话不多说了,直接上命令。

首先我们看看已有的设置.

1
2
3
4
5
6
7

# 查看全局配置中的代理
git config --global --get http.proxy


# 查看当前生效配置中的代理
git config --get http.proxy

然后我们加上自己的代理。
当前我们假设的状态是本机开着小✈或者V2,且代理端口为1080的情况。

1
2
3
4
5
6
7
8
9
10
11
12
13
14
15
16
17
# 括号中的都是可选项

# 若用的小飞机, --global 意味着应用到全局设置
git config (--global) http.proxy sock5://127.0.0.1:1080
git config (--global) https.proxy sock5://127.0.0.1:1080

# 这样应用后,没开代理GIT就会抽风了,所以如果平时速度还不错的话记得用完取消代理
git config (--global) --unset http.proxy (sock5://127.0.0.1:1080)
git config (--global) --unset https.proxy (sock5://127.0.0.1:1080)

# 若用的V2, --global 意味着应用到全局设置
git config (--global) http.proxy http://127.0.0.1:1080
git config (--global) https.proxy https://127.0.0.1:1080

# 取消
git config (--global) --unset http.proxy (http://127.0.0.1:1080)
git config (--global) --unset https.proxy (https://127.0.0.1:1080)

挂了代理真的飞速,爽到。